


Bearing faults are the most common cause of motor failure, according to a survey conducted by the Institute of Electrical and Electronics Engineers (IEEE). Improper installation, maintenance and operation can all contribute to premature bearing failure and costly downtime for motor maintenance or replacement. This article outlines best practices for maintenance personnel to ensure motors are properly installed and maintained. Users should always follow the manufacturer’s guidelines for their specific equipment.
New Motor Receipt, Handling & Installation
As with any purchase, always inspect the motors upon receipt to ensure they were not damaged in shipment. Also, check the nameplate for proper voltage, frequency, horsepower, rotations per minute (rpm) and rotation. Safe, controlled handling is critical. Whether moving the motor in the receiving dock area, to storage or to the installation location, ensure the lifting equipment is rated for the load. To avoid contaminating the motor winding, the sumps on any oil lubricated motor should be dry when a motor is being relocated.
The ideal installation location of the motors will include the following:
- temperature no greater than 40 C standard ambient
- clean, dry, well ventilated, properly drained
- accessible for maintenance
- and inspection
- minimal ambient vibration
- no combustible materials in proximity
To ensure adequate cooling ventilation around the motor, do not install in close proximity to walls, barriers or other motors and equipment. A rule of thumb is to allow spacing of at least one motor width to any barrier to air flow. Motors operating above 1,800 rpm may be allocated additional clearance (twice the motor width) due to the typically higher heat loads.
Once a user has safely moved the motor to its well-ventilated, accessible, not too hot, clean and vibration-free home, it is ready to be securely installed and mechanically and electrically connected. Vertical motors require several distinctive constraints to be addressed.
Mechanical Installation Checklist
1. Oil lubricated: Verify the motor is within 1 degree of vertical to ensure proper lubrication system function.
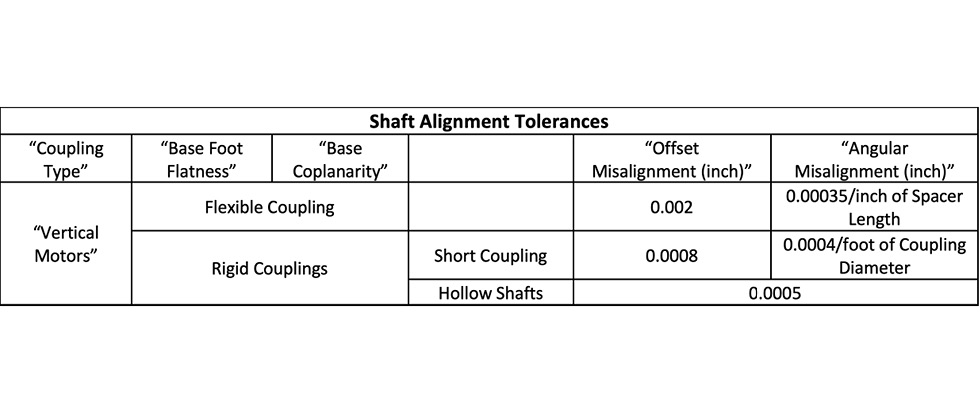
2. Shaft and flange alignment must be within tolerance (Image 1).
3. Water cooling (if equipped) provides a minimum of 4 gallons per minute (gpm) at 125 pounds per square inch (psi) and a maximum temperature of 90 F.
4. The coupling should be aligned and balanced; a self-release coupling should not be used if upthrust is possible or if in a sparking environment.
Electrical Installation Checklist
1. Supply voltage should be within +/- 10% of nameplate. Unbalanced (phase-phase) supply voltage will reduce the motor’s output below rated output by an amount (%) approximated as 100 x average input voltage deviation/average input voltage.
2. For motors driven by an adjustable speed device (ASD), installation considerations will include:
a) Line length: Longer line lengths cause voltage wave reflections, resulting in voltage spikes that can damage winding insulation. The maximum cable length ranges from 50 to 400 feet depending on voltage and switching frequency. Consult with the manufacturer for guidance.
b) Ground wire: Ungrounded motors can cause induced rotor voltages to accumulate and discharge through the bearing, shortening the life of the motor. Due to the high switching frequency of the drive, a stranded ground should be used for best performance.
c) Conduit: For best performance, a conduit should be composed of metal, shielded and grounded to both the motor and ASD.
d) Power cables: Shielded cables are recommended.
e) Input line power conditioning: Depending on the line length, consider incorporating load reactors, change in voltage divided by change in time (dV/dt) filters or sinusoidal filters to eliminate motor-damaging high voltage peaks.
Note: Motors operated on ASDs should be compliant with National Electrical Manufacturers Association (NEMA) MG1 Part 31.
Ongoing Maintenance: Inspection & Cleaning
To keep motors running smoothly and at top efficiency, perform maintenance on a regular basis. More frequent inspections and cleaning will be necessary in environmental conditions such as high heat, extreme cold, poor ventilation or areas exposed to grime and dirt. Maintenance steps include cleaning, inspecting, and in some cases, contacting a motor service provider.
The first step is to wipe off dirt, oil, grease, water or other substances that may contaminate the windings. Dry compressed air at 40 to 60 psi and a vacuum cleaner can also be helpful in removing dust and particulates. If the windings are contaminated with grease or oil that cannot be eliminated, a service shop should be utilized to disassemble the motor and clean it with a solvent, thoroughly drying it before reassembly.
Comparing Oil & Grease Lubrication
Lubrication is an important part of maintenance, and the steps vary depending on the type of lubrication being used.
There are two types of motor bearing lubrication—oil and grease. A single motor may have both types. For example, a vertical motor thrust bearing may be oil lubricated while the guide bearing on the same motor is grease lubricated. Thrust bearings, which generate high heat loads, are often oil lubricated, as oil is suitable for higher temperature environments. In general, oil offers better cold start properties than grease (lower viscosity), is better than grease at carrying away contaminants and can be changed without dismantling the motor.
The vertical motor guide bearing does not generate nearly as much heat as the thrust bearing, which allows for grease lubrication to be utilized. In general, grease lubrication is suitable for moderate speeds and temperatures. Grease also acts as a sealant or barrier to contamination, keeping damaging particulates away from the bearing.
Lubricant Compatibility
As a maintenance step, it is critical to use a lubricant that is the same as or compatible with the type currently in the motor. A lubricating grease consists of a lubricating oil suspended in a thickener such as lithium, polyurea and clay. These thickeners are not compatible with each other. Mixing greases with non-compatible thickeners will result in a lubricant softer than either of its components, with reduced bearing lubrication capability. Similarly, lubricating oils must also be compatible; compatibility should be assessed on a case-by-case basis in conjunction with the manufacturer’s recommendation.
If the type of oil or grease in the motor is unknown, it is best to clean the motor of the existing lubricant and start fresh with a known and recommended lubricant.

Bearing Lubrication Maintenance Steps for Oil Lubricated Bearings
A well-run maintenance program will keep record of, at minimum, maintenance intervals and lubrication types utilized.
Oil should be changed annually under normal conditions. Increase the frequency if the motor experiences frequent starts/stops or is located in damp, dusty or hot environments. Replenish the reservoir only when the motor is off. Follow the manufacturer recommended viscosity and base type. See Image 2 for more information.
Grease should be changed per the manufacturer’s recommendations. Factors such as operating temperature, moisture, particle contamination, bearing orientation, vibration and grease quality may all influence periodicity. A sound and vibration monitoring program that regularly gathers information to enable trend analysis will also provide indicators of when it is time to grease the bearings.
The importance of utilizing the correct quantity of grease cannot be overstated. If a motor contains too much grease, the bearings are prevented from smoothly rotating and will churn the grease. This churning creates heat, which prematurely breaks down the grease such that the lubricating properties are compromised, leading to bearing failure.
Storage To-Dos
Often, motors are placed in storage before they are moved to their ultimate installation location. Improperly stored motors may experience bearing damage due to either corrosion or flat-spotting.
Short-term storage (less than a month) is straightforward. Simply remove the shrink wrap that was on the motor when it shipped from the factory and energize the space heaters to keep the windings dry.
Storage periods between one and six months require additional steps:
1. Store indoors in a clean, dry area if possible. Do not locate the motors in an area that experiences excessive vibration, which can cause damage to bearings.
2. If stored outdoors, take steps to prevent pests from nesting inside the motors. Apply a rust preventative coating on all external machined surfaces to preserve the motor enclosure.
3. Rotate the shaft monthly and keep oil sumps filled. New oil-lubricated motors are shipped without oil. Never move a motor that has oil in the reservoir, as sloshing can contaminate the windings.
4. Ensure adequate heating to prevent moisture condensing inside the motor, potentially causing electrical shorts.
a) Keep space heaters energized (maintain windings five degrees above ambient).
b) If no space heaters, energize a single winding with a low voltage or use an auxiliary heat source blowing hot, clean air.
For storage longer than six months, follow the above tips, plus these steps:
1. For grease-lubricated motors, fill the cavity with lubricant.
2. Conduct regular insulation testing. A one minute insulation resistance (IR1) test will stress the insulation to check its insulation values.
3. A polarization index (PI) test determines the presence of high leakage current due to deteriorating insulation.
Best maintenance practice is to conduct tests under consistent conditions and at the same time intervals, allowing meaningful trend analysis.
Following these installation, maintenance and storage steps will prevent many common causes of early motor failure, keeping operations running smoothly and preventing costly downtime from an unexpected failure.