


Flushing the toilet is a pleasantry of modern civilization that is taken for granted. The public rarely concerns itself with what happens to the water, nor does it want to. If wastewater professionals do their jobs well, that will continue to be a mystery. There are many stages, components and processes to take that waste and return it to the environment, but this series will focus on residential and light commercial sewage pump package systems and how to provide trouble-free operation.
This is not a pump sizing course, but a list of questions will appear in Part 2 for convenience. Whether you’re a pro or a newbie, gathering the proper information is the most critical step, and the list of questions should provide enough information to make a proper selection. Let’s start by explaining the various components of a packaged system.
Pump: This is the heart of the system and typically a submersible, automatic pump. The pump allows us a way to convey waste where gravity flow is not feasible. It needs to be capable of moving enough water to prevent overflows or backups and be able to overcome the elevation, friction loss and any other pressure requirements between the pump and outfall of the system.
Basin: This is the container that collects the sewage and houses the pump and level monitoring devices. It is typically polyethylene or fiberglass. It can be installed indoors or outdoors.
Controls/alarm: These will monitor the liquid levels within the tank, turning the pump on and off or notifying the owner of a potential backup or system issue.
Piping and fittings: The proper valves, pipes and diameters are critical for installation.
Pump
There are two options when selecting a sewage pump: solids handling pumps and grinder pumps. Solids handling pumps are designed to pass the solids through the pump. They typically have a recessed, vortex or semi-open impeller with enough spacing to pass a minimum 2-inch spherical solid through the pump. Recessed vortex impellers allow the solids to pass beneath the impeller and tend to be more reliable against clogging. Solids handling pumps tend to produce higher flows but lower head, or pressure.
Alternatively, there is the grinder pump. Rather than passing the solids through the pump, grinder pumps grind the sewage into a fine slurry, allowing for tighter tolerances within the pump and thus different performance characteristics. Centrifugal grinder pumps generally produce 30 to 50 gallons per minute (gpm), which is sufficient for most residential and light commercial applications. These pumps are also capable of much higher heads than solids handling pumps.
Ultimately, either option that can meet the hydraulic requirements will be acceptable. Given the sufficient flow, higher heads and ability to chew through domestic waste, grinder pumps are generally the more robust option in a packaged system when pumping to municipal sewer. If pumping to a septic tank, grinders should not be used. Septic tanks are designed to separate the fats, oils, greases and solids from the water and grinder pumps make this far more difficult. Therefore, if you are pumping to a septic tank, be sure to use a solids-handling pump.
Basin
Location is one of the most important aspects for a residential package system, as it will dictate the size and type of basin used. It is important to consider if the basin will be installed indoors or outdoors, the inlet depth and location (the inlet is the primary drainpipe that brings the waste to the basin) and the frost depth (to prevent freezing pipes). Indoor basins will typically be protected from the environment, which minimizes the chance for freezing. For this reason, indoor basins better fit the one-size-fits-all approach. Most manufacturers will pair their pumps with an appropriate basin for an off-the-shelf solution, and as such, sizing the basin is typically not a requirement.
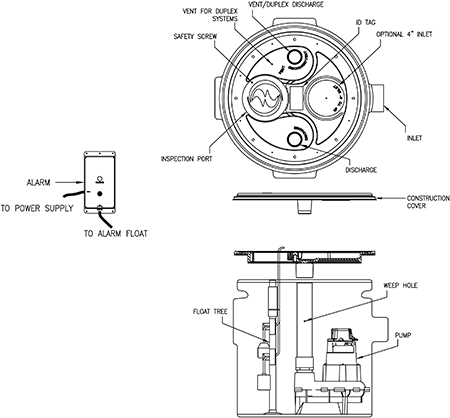
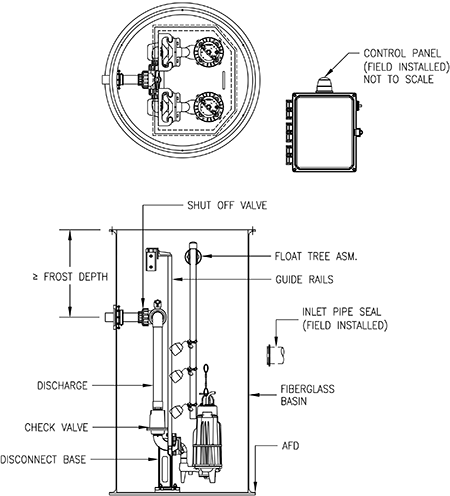
Image 1 shows a typical simplex indoor packaged system. Outdoor installations will vary from region to region, and possibly home to home, where the one-size-fits-all approach is not as applicable. The primary differences are due to the inlet level below grade and frost depth, which directly impacts the depth of the basin. As you move further north, the frost depths get deeper and ultimately require deeper basins. Deep inlets will also require deeper basins and are typical with homes that have plumbing fixtures in the basement. If the stub out from your home is 9 inches below grade, you will likely need an 11- or 12-inch deep basin. Therefore, it is beneficial to locate the stub out at a location that minimizes the depth below the finished grade outside of the home. Image 2 shows a typical duplex outdoor package system.
Controls/Alarm
It is not ideal for pumps to run continuously, nor is it ideal for an owner to have to plug their pump in every time they flush a toilet. Most package systems are paired with an appropriate means of automating the system. Typical options are automatic pumps, pump switches or control panels. Automatic pumps have a float switch built into the pump. As the water rises, the float rises, switching the pump on. As the water level drops, the float drops and will eventually switch the pump off. Automatic pumps will have a limited range of operation but are typical in residential applications.
Pump switches can be paired with pumps that do not have a float switch built in. The pump switch is typically plugged into the outlet and the pump plugged into the back of the switch, as seen in Image 3.
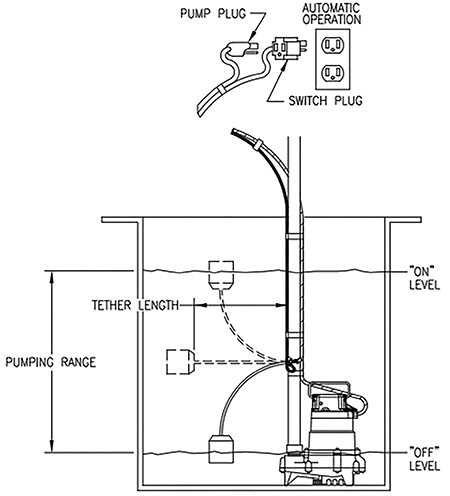
When the pump switch is in the down position, it creates an open circuit and will interrupt power from the outlet to the pump. When the float rises, the contact inside the float will close, allowing power to flow through the switch and into the pump. At that point, the pump is activated, the water level and float drop, the contact opens and the pump stops. Since the full electrical load of the pump passes through the switch, the pump switch needs to be rated for the volt and amps of the pump. Switches allow for more variable on and off points by varying the tether length of the float or using a double float switch that has a separate float for the on and off points.
For installations with automatic pumps or pump switches, an alarm should always be used. The alarm is generally contained in a small box that connects to a float inside the basin located a few inches above the pump activation point. In the event of pump failure, the alarm float will raise and sound an alarm notifying the owner of an issue. Some alarms offer remote monitoring, allowing the owners to receive text, email and/or push notifications in the event of an alarm condition. Be sure to check with manufacturers to see what remote monitoring options they offer and if the service is free or requires a monthly fee.
Control panels offer the greatest flexibility and are more commonly used on outdoor installations. They are typically comprised of a weatherproof enclosure and require three to four floats to monitor the liquid levels: off, on, high water and a lag float for duplex applications. Control panels offer greater variability of set points, ease of troubleshooting and additional monitoring, and they are configurable to job-specific requirements.
Fittings & Valves
The site and location will dictate which fittings are needed to get from the pump to the outfall, but there are some considerations that should be taken for each installation. At a minimum, every installation should include a check valve and shut-off valve.
The check valve protects the pump from backflow, which could lead to short cycling, overflows and impeller backspin. For indoor installations, spring-loaded check valves are recommended to help eliminate water hammer and offer a quiet operation. The shut-off valve allows service providers to isolate the pump from the discharge to remove, service and replace the pump as needed. If not already done by the manufacturer, weep holes should be drilled in the discharge pipe, below the check valve and inside the basin. Air can get trapped inside a pump as the basin fills with water, and when the pump activates, no water is pumped out because the impeller is spinning in the air. This is typically referred to as air-lock and can be easily avoided with a weep hole that allows air to escape the pump as the water rises.
If pumping is being done to a pressure sewer system, often referred to as a low-pressure sewer system, a curb stop must be installed. A curb stop is an additional, redundant check and isolation valve installed at the curb of the home prior to the connection to the pressure main. This is critical to isolate the on-lot components from backflow or air in the common main and provide isolation in the event any components need to be serviced. An access riser should be included with the curb stop so the isolation valve can be accessed.